Creating A Mac Flash Boot Disk For High Sierra From Disk Utility
Sep 13, 2018 Open Disk Utility in the Utilities' folder. After Disk Utility loads select the drive (out-dented entry with the mfg.' S ID and size) from the side list. Click on the Erase tab in the Disk Utility toolbar. Name the drive, 'MyVolume'. Mac OS Extended. IF the Mac will boot from High Sierra, the following might apply: 1. Create a bootable USB flash drive installer, as suggested above. Have a SECOND flash drive on-hand. Boot from the bootable flash drive installer. Connect the SECOND flash drive. Open the OS installer and 'aim it' at the empty 2nd flash drive.
Apple has released mac OS High Sierra 10.13 to the world yesterday. In this simple and easy to understand tutorial, you will be able to create mac OS High Sierra 10.13 USB Bootable Disk. Mac users can now download and install mac OS High Sierra 10.13 in iMac, Macbook Pro, Mac mini and Macbook 12 inch laptop as well. The compatibility is pretty high, just like previous mac OS Sierra.
One of the top and most expected feature addition in mac OS High Sierra 10.13 is the APFS (Apple File System) coming to mac computers. Though, it is currently limited to SSD Storage only Mac computers, apple is working on a fix to bring it to Hard Disk enabled mac computers very soon.
There is also a video tutorial to make it much easier for anyone to create the USB Bootable Disk of mac OS High Sierra. Here are some of the important feature highlights of mac OS High Sierra 10.13.
Also Read, Best Microsoft Office 365 Alternatives for Mac OS
APFS – New Apple File System that is designed for 64 bit architecture. It is meant for flash technology that is used by mac computers widely since 2015. This new File System from Apple is ultra Responsive that makes your work flow complete breeze without any hiccups. APFS has built-in Encryption, Crash Safe Protection and Simplified Data Backup on the Go.
HEVC – High Efficiency Video Coding also known as H.265 arrives on Mac that can compress video up to 40 percent more than its predecessor. This makes 4K Video Streaming possible and seamless in many countries that are still using average Broadband Internet Speed. Also this will consume less Internet Bandwidth and saves big on Bills.
Metal 2 – Remember the Metal platform launched by Apple couple of years ago?. Now with Metal 2, it brings tons of advancements and machine learning capability to your Mac computer. Metal 2 has advanced technology to content creators who are going to create immersive contents in Virtual Reality, other Creative Applications and Games.
Apart from these three essential feature additions, there are tons of major and minor improvements under the hood. Also, your existing Apps like Photos, Mail, Safari have got major feature additions and core upgrades in this mac OS High Sierra 10.13.
Create mac OS High Sierra USB Bootable Disk [Video]
Download mac OS High Sierra 10.13 today and enjoy all the new feature additions that comes to your Macbook or iMac computer. In just couple of easy steps, you will be ready with your mac OS High Sierra USB Bootable Disk.
Also Read, Macbook vs Macbook Air vs Pro, Best Macbook to Buy?
Important Note: Once you downloaded mac OS High Sierra 10.13 from Mac App Store, do not click on “Continue” button. You must take the backup of High Sierra before installing it on your Mac computer. To prevent the file from being auto deleted after installation, we must take the backup.
Go to “Applications” folder via “Finder” and copy “Install mac OS High Sierra.app” file and paste it in Documents or to any secondary hard disk drive.
:max_bytes(150000):strip_icc()/ScreenShot2020-04-01at3.55.27PM-eb4c5b4bd4ae40588f0a7a388afe62aa.jpg "El capitan bootable usb windows")
Alright, let’s start with the steps to Create USB Bootable Disk of mac OS High Sierra 10.13.
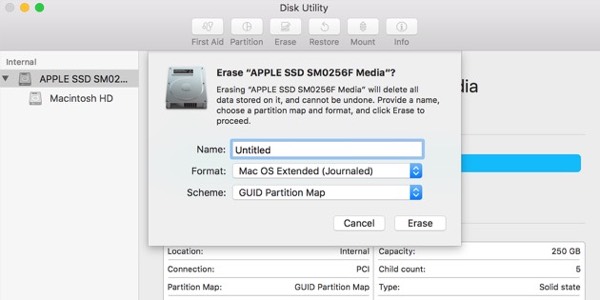
Step 1: Prepare the USB Drive for creating mac OS High Sierra 10.13 USB Bootable Disk by Formatting it to “Mac OS Journaled” using “Disk Utility” app.
Step 2: Now Launch Terminal and copy, paste the following code to start the Formatting and creating of USB Bootable Disk. The following code is configured to pick up mac OS file from “Applications” folder.
If you see any errors while copy pasting the following code, modify the single dash to double dash that are prefix to – –volume, applicationpath and nointeraction functions.
sudo /Applications/Install macOS High Sierra.app/Contents/Resources/createinstallmedia –volume /Volumes/UNTITLED –applicationpath /Applications/Install macOS High Sierra.app –nointeraction
Note: You can rename “UNTITLED” from the above code to match your Disk Name after it is formatted by Disk Utility App.
Step 3: You will see the following screen when it starts creating USB Bootable Disk of mac OS High Sierra 10.13. About the timing, it takes around 10 to 15 minutes to complete the disk creation process. Once done, you can start installing mac OS Sierra 10.11 on other mac computers you own or share it with your friends and save them some time and Internet Bandwidth from downloading the installer file.
Congratulations! You’ve successfully created mac OS High Sierra 10.13 USB Bootable Disk. Feel free to share this post with your friends and followers.
You may also like to Read,
Apple stripped the ability to make Windows 10 install media from a flash drive or external SSD in Sierra, but sometimes, you still need to be able to do it from a Microsoft-provided download. AppleInsider shows you how to do it.
First, get the .ISO file from Microsoft here. Importantly, this doesn't contain a license code, so you'll need to get one of those yourself.
We implore you — get the .ISO from Microsoft. Don't use a shady source.
Making a Windows 10 install disk from macOS High Sierra isn't as simple as formatting a drive in Disk Utility and copying over files in the Finder — you need to use the Terminal. So, mount the disk you want to make install media, and open up the Terminal.
Find the name of the drive that you want to install the media on. Be sure that you've got this right — because in later steps you can do massive damage to your boot drive if you're not careful.
Type diskutil list in the Terminal window to get a list of your drives. In our case here, it's 'disk2.' We'll use 'disk2' going forward with this tip, but in the place of 'disk2' use which disk identifier is appropriate for you.
Next, we'll format the disk in Terminal. Enter
This will format the drive suitable for a UEFI boot, name it 'WINDOWS10,' and mount it.
Dungeons and Dragons Online: Eberron Unlimited (or DDO) is a free-to-play instanced massively multiplayer online role playing game run by Turbine Inc set in the semi-steampunk fantasy world of. Dungeons dragons online guide. Dungeons & Dragons Online is a free to play. You can still purchase from the game store of DDO. There is a good community between gamers on DDO. There is a good balance between classes and races. Many users are pleased with combat system. You will able to set up hardness of dungeons on the game. Enter a world of danger and adventure with Dungeons & Dragons Online® based on the beloved RPG that started it all. 71% of the 105 user reviews in the last 30 days are positive. 71% of the 3,095 user reviews for this game are positive. Purchase the Dungeons & Dragons: Shadowfell Conspiracy today! This product is not eligible for refund.
Your Windows 10 .ISO file download is probably in your Downloads folder. Mount the .ISO by double-clicking on it. It is probably called 'CCCOMA_X64FRE_EN-US_DV9' but double-check.
A Finder copy doesn't work. In the Terminal enter:
cp -rp /Volumes/CCCOMA_X64FRE_EN-US_DV9/* /Volumes/WINDOWS10/
The Terminal will sit there for a minute, seemingly unfazed by your command. However, it is working, and after a period of time depending on the speed of your media it will complete unceremoniously — but your data will be copied, and your media will be bootable.
AppleInsider has affiliate partnerships and may earn commission on products purchased through affiliate links. These partnerships do not influence our editorial content.